How to Avoid Common Kitchen Cabinet Painting Mistakes
Let’s be honest a fresh coat of paint on tired kitchen cabinets can feel like magic. It’s cheaper than a full replacement and completely transforms the heart of your home. But I’ve seen too many DIY projects go sideways: sticky drawers, brush marks that look like a topographic map, and peeling edges after just a few months. At Marz Painting Service, we’ve rescued countless cabinet jobs in Florin, Folsom, Roseville, and across the Sacramento area. The good news? Almost every disaster is preventable. Here’s your road map to avoiding the most common kitchen cabinet painting mistakes so you get that smooth, durable, showroom finish you’re dreaming of.
Mistake #1: Skipping the Deep Clean & Degreasing
Kitchen cabinets collect a invisible film of grease, cooking oil, and grime, especially near the stove. If you paint over that, nothing will stick properly. I’ve peeled off entire sections of “freshly painted” cabinets where the homeowner forgot to degrease. Use a heavy-duty cleaner like trisodium phosphate (TSP) or a grease-cutting degreaser. Scrub every surface, including the tops and edges. Rinse twice with clean water and let dry fully. Our crew in Folsom always does the “white glove” test: run a finger along the top of a cabinet door. If there’s any residue, you’ll feel it. Clean until squeaky clean no shortcuts.
Mistake #2: Not Sanding or Using the Wrong Grit
Paint needs something to grip. Shiny laminate or factory finishes repel paint like water off a duck’s back. Lightly sand all surfaces with 120- to 150-grit sandpaper to knock off the sheen and create micro-scratches for adhesion. But don’t over-sand you’re not trying to remove the veneer. After sanding, vacuum and wipe with a tack cloth. For cabinets in older Sacramento homes that might have lead-based clear coats, test first and take proper safety measures. For raw wood, start with 100-grit, then move to 150. Skipping sanding is the fastest way to get peeling paint in six months.
Pro tip: Use a sanding sponge for contours
Cabinet doors have grooves and raised panels. A flat sanding block misses those details. Use a flexible sanding sponge to get into corners. Your future smooth paint job depends on it.
Mistake #3: Using the Wrong Paint (Please, not wall paint)
I can’t tell you how many times someone grabs leftover living room eggshell latex. Wall paint is too soft for cabinets it chips, stains, and never hardens properly. You need a durable, scrubbable finish. Use a high-quality cabinet paint: enamel based acrylic-alkyd hybrid or a dedicated cabinet and trim paint. Look for self-leveling properties that hide brush strokes. In high-humidity kitchens (and even dry Roseville summers), opt for a waterborne alkyd enamel it levels like oil but cleans up with soap and water. Semi-gloss or satin sheens are best: they resist moisture and wipe clean easily.
Mistake #4: Forgetting Primer (It’s Non-Negotiable)
Primer isn’t optional—it’s the foundation. A quality bonding primer seals raw wood, blocks tannins (hello, oak cabinets turning pink!), and helps topcoat adhere evenly. For laminate or previously painted cabinets, use a high-bonding primer like shellac-based or an adhesion promoting primer. We swear by oil-based or shellac primers for covering dark colors and preventing bleed-through. Apply thin, even coats and let it cure fully. One of the biggest regrets I see in Florin kitchen renos is skipping primer to save an hour. Don’t. It will cost you triple the time in redoing everything later.
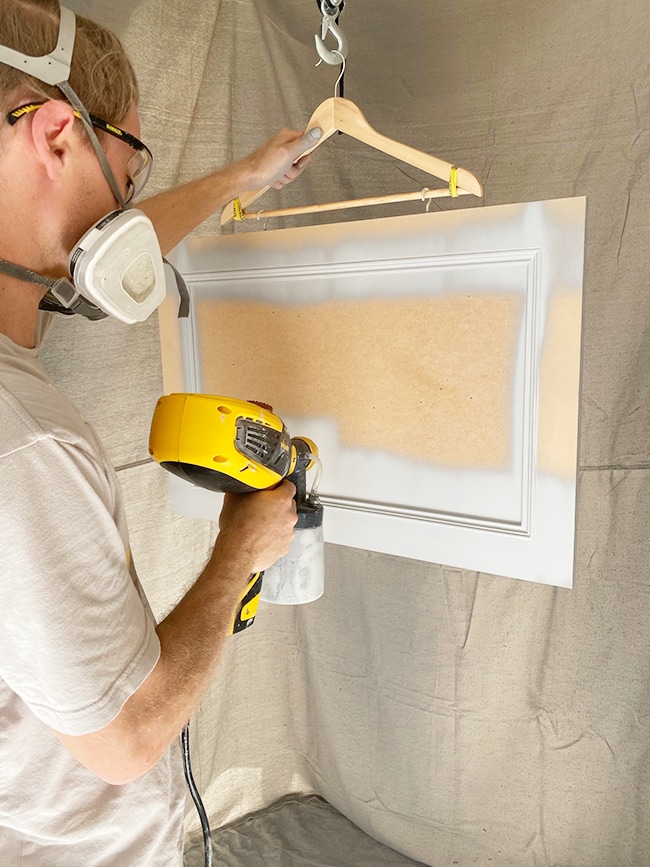
Mistake #5: Rushing Between Coats & Ignoring Dry Time
Patience is a virtue, especially with cabinets. You might think the paint feels dry to the touch after two hours, but it’s not fully cured. If you sand or apply a second coat too soon, you’ll get gumminess, peeling, or trapped moisture. Follow the manufacturer’s recoat times religiously typically 4-6 hours for water-based enamel, or overnight for oil-based. Lightly sand with 220-grit between coats for a buttery finish. And here’s a secret from our Sacramento team: wait at least 24 hours before re-hanging cabinet doors, and 5-7 days before heavy use. Rushing leads to sticking doors and chips.
✅ Conclusion: Your Roadmap to Professional-Looking Cabinets
Avoiding these wallpaper removal mistakes comes down to three things: proper prep, using the right tools, and patience during the process. Score and soak thoroughly, never rush dry stripping, and always use an effective removal solution or steamer. Work in sections and allow enough time for the adhesive to loosen for a clean finish. And don’t forget to label your doors and hardware makes re-installation painless. If you want a stress free transformation with a flawless, lasting finish, the experts at Marz Painting Service are just a call away. We serve Florin, Folsom, Roseville, and the greater Sacramento area with residential painting that turns kitchens into showpieces.
Ready to give your kitchen cabinets the upgrade they deserve? Let’s make it happen.
🏠 Visit Website